Variation:
I didn't have butter milk. I was instending to make it by making butter then rinse for butter milk but I didn't have time. Luckily About.com has a substitution for ya.
 |
| Butterfly: cream cheese icing |
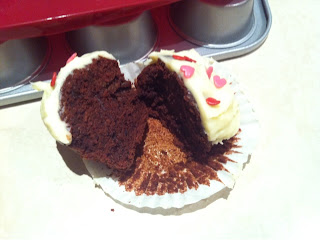
I failed to follow the order of creaming butter & then adding sugar etc. but it mixed very well anyway in the TM. Only required a little extra mixing at speed 4. I added the food coloring but only had a small bottle of 1 table spoon. You shall see that it was a bit of a fail ;( Maybe the cocoa powder cancelled it out! I can see some red, just not enough to be called red velvet.
 Baked as cupcakes instead of cake so it's slightly drier than a 'moist' red velvet, more cocoa in taste than sugary.
The cream cheese icing was same measurement, but I think I added a little bit of lemon zest to it. The sugar icing hearts were store bought decorations. My friend who was there to 'help' (read: eat) was responsible for decorating. Hence, 1 heart each cupcake, until I jumped on her to liberally sprinkle!
(Once I get on a PC I'll update this entry with full recipe and the TM instructions. Done)
I pulled stuff from two or three recipes:
Red Velvet CupcakesIngredients: 300g plain flour
50g cocoa powder
150g butter, at room temperature
100g white caster sugar
2 large egg
1/2 teaspoon vanilla extract
220mL buttermilk (my substitute was freshly squeezed lemon & white vinegar in milk, left to sit for 10mins - see here for their substitution recommendations)
1 tbs red liquid food colouring (I had less than this... you may want to put more to make yours look REDDER)
1/2 tsp white vinegar
1/2 tsp bi carb soda
Cream Cheese Icing 250g cream cheese, at room temperature
1 tsp vanilla extract
110g icing sugar, sifted
My lazy method: 1. Preheat oven to 170 degrees C (fan forced)
2. In the bowl beat the butter until soft [20 seconds on Speed 5]
3. Add the caster sugar and beat until light and fluffy [30 seconds Speed 5]
4. Add the eggs and beat [10 seconds Speed 3].Scrape down the sides of the bowl I keep forgetting this part
5. Add the vanilla extract and beat until combined [5 seconds Speed 6]
6. Add buttermilk [Speed 3]
50g cocoa powder
150g butter, at room temperature
100g white caster sugar
2 large egg
1/2 teaspoon vanilla extract
220mL buttermilk (my substitute was freshly squeezed lemon & white vinegar in milk, left to sit for 10mins - see here for their substitution recommendations)
1 tbs red liquid food colouring (I had less than this... you may want to put more to make yours look REDDER)
1/2 tsp white vinegar
1/2 tsp bi carb soda
Cream Cheese Icing 250g cream cheese, at room temperature
1 tsp vanilla extract
110g icing sugar, sifted
My lazy method: 1. Preheat oven to 170 degrees C (fan forced)
2. In the bowl beat the butter until soft [20 seconds on Speed 5]
3. Add the caster sugar and beat until light and fluffy [30 seconds Speed 5]
4. Add the eggs and beat [10 seconds Speed 3].
5. Add the vanilla extract and beat until combined [5 seconds Speed 6]
6. Add buttermilk [Speed 3]
7. Add red food colouring. [Speed 3 continues]
8. Add the flour mixture. [Speed 3-5 to mix]
9. Add vinegar and bi carb soda. [Speed 6]
10. Divide the batter amongst your prepared muffin cups. Smooth the tops
11. Bake in the oven for 15-25 minutes, or until a toothpick comes out clean (I over did it at 25mins)
12. Cool the cakes on a wire rack until completely cool.
13. In clean TM Bowl, attach TM Butterfly. Add cream cheese [20 seconds Speed 4], I must remember to cube next time, the whirling sound of the whole block of 250g was scary.
14. Scrap bowl down. Add icing sugar and vanilla extract. [20 seconds Speed 4]
 |
| Sherbet - Red Velvet Layer Cake |
From the photos - it really looks like the red-ness is pretty even between the two.
The icing used by Sherbet was just sugar icing *(maybe butter cream-ish) not a cream cheese one.
 |
| Centre of my Red Velvet Cupcake |
Rating:
3.5 stars - I think this could've turned out better. it was a little dryer than I expected, but I did use more cocoa powder and a little less butter than the recipe. Tempted to add banana next time.
This did take me nearly 1.5 hours to make. From first dumping in butter to finalising the heart sprinkles.
Parents loved this as it wasn't as sugary as store-bought mixes or the usual cafe cupcakes! For those watching their sugar levels, it is ok to reduce the sugar in your cakes, muffins, cupcakes - once you realize how much sugar goes into the ones you buy outside, you will buy/eat less!


No comments:
Post a Comment